Tuesday, October 27, 2020

Your Next Stamp - Mini Tweet Holiday Greetings


Oh so cute... I loved this little chick so much that I made 6 of them. This stamp set is by Your Next Stamp and is called Mini Tweet Holiday Greetings.


CYNS513 Stamp set


Copic Color Chart
Yellow - Y02 Y15 Y38
Beak - YR04 YR18
White - C1
Green - YG11 YG13 YG17
Red - R24 R29 R59
Orange - YR04 YR07 E08
Blue - B21 B23 B24
Light Blue - B00 B02 B04
Aqua - BG11 BG13 BG18

This cheerful winter season card is made up of a few layers.  I started the card by using a medium blue card stock for the base. Then using a bright cobalt blue I cut the windows  using a die from Elizabeth Craft Designs called Garden Patch (1002), adding foam behind this cut out. I then traced the outside edge of the die on school bus yellow paper (to match the chicks) I cut a little on the inside of the traced edge so not to show the yellow on the outside when piecing the card together. I adhered the yellow to the center of the card, adhering the window framed die piece over it. 


I found the blue snowflakes paper in the 6x6 paper pad by Bo Bunny called Winter Getaway Collection. 


I cut 6 squares out of the snowflakes paper using the smallest square of the Dotted squares Dies by Sizzix - Stephanie Barnard.


I arranged the chicks in each of the windows putting foam under each so they would lay flat. I then chose the "Baby it's cold outside" sentiment from the Tim Holtz quote chips - Christmas #TH93753.


Please be sure to subscribe to my blog 

Follow me on Instagram

Subscribe to my youtube channel


Happy Crafting  :)

Angie


Monday, October 19, 2020

Kraftin' Kimmie Stamps - Sandy Toes


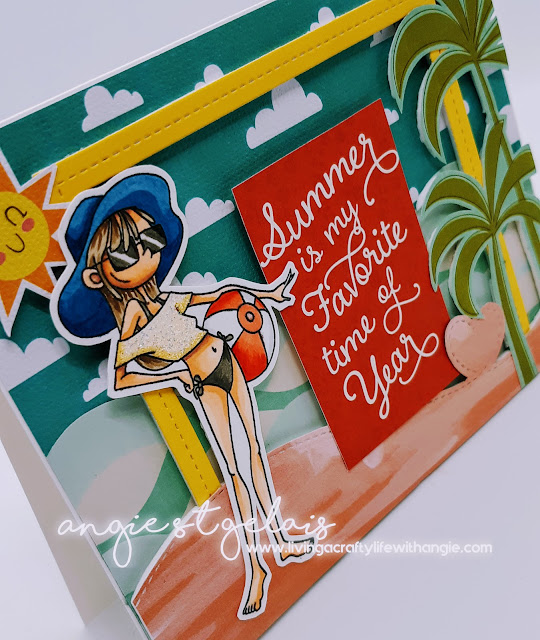
Fresh and fun summer deserves a bright and beautiful card to match. This chic gal by Kraftin' Kimmie Stamps is called Sandy Toes. 


Copic Color Chart

Skin - E000 E00 E01 E02 E04
Hat - B34 B37 B39
Hair - E43 E44 E47
Glasses - W0 W1 W5 W7 W9
Bathing Suit - W5 W7
Shirt - YR30 YR31
Ball - C1 / R20 R22 R27


I fussy cut around the stamped image and covered her top with Diamond Stickles.


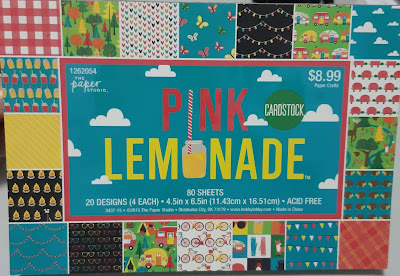
I found a bright cartoon style clouds paper in the 4.5 x 6.5 paper pad by The Paper Studio called Pink Lemonade. I cut this as my base and adhered to the card.


For the next layer; the waves I used The paper studio called A day at the beach. I fussy cut along a wave path approximately 2-1/2 inches from the base and then adhered to the card base.


The next step I cut the yellow frame using a bright yellow paper I found in the 6x6 paper pad by Lawn Fawn called Really Rainbow.


The Frame was cut out using the My Favorite Things called Square stitched frame. I added foam to the frame.


The next step was to fussy cut palm trees from the paper pad by The Paper Studio - A day at the beach. I added foam to the tree where it butted up against the yellow frame. I did not adhere the bottom 1/2 inch of the left tree right away so I could sneak the pink sand underneath it.

The pink sand was actually a pink sky I found on a paper in the 6x6 paper pad by American Crafts called Twilight - one canoe two.


I flipped the farm paper upside down and used the Lawn Cuts- stitched trails by Lawn Fawn to create my pretty pink sandy beach. I added foam to the back and adhered it to my card, I was then able to adhere the bottom portion of the left tree.


The sun I found in the Pink Lemonade paper pad and I fussy cut around it and added foam to the back before adhering to the card.

The sentiment I found in the Echo Park 6x6 paper pad called  Good day sunshine.


The last step I adhered the fussy cut stamped image to the card adding foam to the back where necessary to lay flat.


Please be sure to subscribe to my blog 

Follow me on Instagram

Subscribe to my youtube channel


Happy Crafting  :)

Angie

Tuesday, September 29, 2020

Kraftin ' Kimmie Stamps - Let them eat cupcakes


To really make a stamp pop try a subtle matting and a lot of white. This great stamp set is by Kraftin' Kimmie Stamps and is called "Let them eat cupcakes". A simple sentiment makes this the perfect card for any reason, be it birthday or just because.


Copics List 
Skin E00 E01 E02 E04
Hair C1 C3 C5 C7
Buns E21 E23
 Shirt C1 C3
Pants B93 B95 B97 B99
Shoes B93 B97
Headband B95 B97 B99
Yellow Y06 Y13 Y19
Red R24 R29 R59


For the base I used a beautiful blue patterned paper from My Mind's Eye 6x6 paper pad called "Nutmeg". 


The sentiment is an oldie but a goodie from Stampin' Up called "Short and sweet".


I added foam under the sentiment to add dimension.


Please be sure to subscribe to my blog 

Follow me on Instagram

Subscribe to my youtube channel


Happy Crafting  :)

Angie


Tuesday, September 1, 2020

Your next Stamp - Cute Home


Whether you're celebrating a friend's new home or sending a note to a long lost pen-pal this "Cute House (CNYS423) stamp set is perfect. A great Canadian stamp company, Your Next Stamp, brings you this versatile stamp set. One of my go-to papers is Neenah 80lbs Super Smooth Coverstock paired with Black ink - India Ink by Hero Arts. The black is rich and crisp and the Copic markers blend well on these sheets without a worry. 80lb coverstock is great when you are fussy cutting around an image and it will hold up well.


Copic Color Chart:
Yellow: Y11 Y13 Y19
Blue: B000 B00
Green : YG03 YG05 YG06 YG07
Red: R14 R29 R39
Grey Roof and Steps: C1 C3
Windows: N2 N4
Brown : E23 E25

For the background I used a fun rainbow themed paper I found in Lawn Fawn's "Really Rainbow" 6x6 paper pad.


To create the grass I found a scrap piece of solid green card stock and put it through my Sizzix Big Shot using the Your Next Stamp "Chunky Grass Die".


You'll find the clouds paper in this oldie but a goodie of a paper pad by American Crafts called #Summer. 


 I used red cardstock to mat the piece and cut out the word Hello with a die that I had in my case, unfortunately I don't know the brand but many companies have great "Hello" dies. I used the same die to also cut out a 2 matching pieces of foam so that it could be layered.


For a hidden fun feature I used the flowers for the inside of the card as I found them to be a tad bit disproportionate compared to the tree and house.


Please be sure to subscribe to my blog 

Follow me on Instagram

Subscribe to my youtube channel


Happy Crafting  :)

Angie

Thursday, August 13, 2020

Kraftin' Kimmie Stamps - Book Dragon


From one book lover to another, this book loving dragon caught my eye and was a joy to color. I snagged this cutie from Kraftin' Kimmies Stamps, it's evidently called "Book Dragon". 


Copics List 
Dragon - YG03 , YG05 , YG06 , YG07, blender to create the dots
Belly - Y13, Y15, Y17
Horns, toe nails, Spikes - C1
Glasses - R24
Book - E21, E23, E25
Shadow - W0, W1, W3

White 110lb cardstock for the base of the top folding A2 card.

The green paper I found in American Crafts "Hip Hip Hooray" 6x6 paper pad. This pad is one of my favorites with it's bright colors and fun patterns, great for bright beautiful birthday cards.
                                  

You can't have a book reading dragon without book themed paper, this primary colored paper I found in Echo Park's 6x6 paper pad called  "Paper & Glue" by Lindsay McLaughlin. This paper pad has many great school themed pages.


To create the white banner I used a ruler and pencil and drew straight lines across being cautious not to cover the dragon, I then cut out the bottom line with a paper cutter and the top line I carefully fussy cut the line up to the image and then around the image. I used foam behind the sentiment and the image to add dimension.  


Please be sure to subscribe to my blog 

Follow me on Instagram

Subscribe to my youtube channel


Happy Crafting  :)

Angie

Wednesday, March 27, 2019

Kraftin' Kimmie Stamps - Gift Wrapping Elf


                                                                                                                                                                                                                                              This fun little "Gift Wrapping Elf" is an older stamp from Kraftin Kimmie Stamps, although it may be difficult to come by... it's worth the search. A cheerful grin is great for your holiday cards. Get started early and you'll be ready to go for next Christmas season. 
To create this card 5"X 7" card I first stamped the image and colored it up and then used Tim Holtz distress ink to dirty up the background, I used a q-tip as I got closer to the image. This was a lot more difficult then just stamping the image again on a masking paper, cutting it out, and covering the image. 

Copic Color Chart
Green : YG03 YG05 YG06 YG07 G07
Red : R24 R29 R39 R59
Ribbon : Y13 Y15 Y19
Hair : Y21 YR18 E08 E09 E19
Skin : E000 E00 E01 E02
Spool : E21 E31 E23 E44


                                                                                                                                                                The patterned paper I chose for the card base was from the Momenta Cardstock 6x6 paper pad.


Please be sure to subscribe to my blog 

Follow me on Instagram

Subscribe to my youtube channel


Happy Crafting  :)

Angie

Wednesday, March 20, 2019

Stampin' Up - Christmas Cutie


                                                                                                                                                                                                                                                                                                                                  This stamp is definitely appropriately named as a "Christmas Cutie".  I stamped the image on white 110lb coverstock.

                                                                                                                                                                                                                                                                                                                                    I created the base of the 4 1/4" x 5 1/2" side folding card by first folding it it half and then cutting off 1 7/8" from the cover piece. I covered the top flap with a piece of yellow cardstock measuring 3 1/2" x 4 1/4". I also covered the inside back piece with a piece of yellow cardstock measuring 2" x 4 1/4". I covered this inside piece using red Magic mesh and cut it to size before adhering this yellow piece to the card base.

I colored this cutie using the following color guide:
Copic Color Chart:
Scraf and Mittens: R29 R59
Yellow: Y11 Y13 Y15
Boots and snow suit: N4 N6 N7 N9
Snow Suit : B21 B23 B34
Hair : E21 E23 E25 E27
Skin : E01 YR00 E02 E04 

                                                                                                                                                                                                                                                                                                                                                                                                                                                                        I used the stampin' up adorning accents edgelits to create the red border detail. To create this I used the scalloped border and secured it to red cardstock using washi tape and the moved the die down a 1/4" secured it with washi tape and then ran it through the big shot again. 

                                                                                                                                                                                                                                              I used the same die to cut a matching border on a piece of striped paper from the Bo Bunny Surprise! Collection 6x6 paper pad. I then secured the red border to this piece, and cut the striped piece to a width of approximately 3/4" by 4 1/4".
I cut a piece of the same red cardstock 3 1/4" x 4 1/8" to create a base for the image. I cut the image 3" x 3 1/4". I used my Stampabilities Happy Birthday #1 stamp for the sentiment and used Stampin' Up Cherry Cobbler ink pad to stamp the "Happy Birthday" on white cardstock that I then cut to 7/8" x 2 7/8". I cut a red border piece 1" x 3" using the red cardstock. I secure the sentiment to the card base only where it met up with the top piece and not the overhang.


Please be sure to subscribe to my blog 

Follow me on Instagram

Subscribe to my youtube channel


Happy Crafting  :)

Angie


Thursday, March 14, 2019

Quilled - Thinking of you


If you enjoy twirling paper paper then quilling is for you. I really enjoyed working in fine detail with making these little flowers. At the time I wasn't sure is quilling was for me so I used paper I had and cut my own strips with a 1/8 inch thickness. I would not recommend this because I wasn't easy to be consistent on the width of the strips and for quilling to look at it's best a better practice is to use the machine cut packs. They are economical and available in a vast array of colors.

I used a fine tip clear glue to secure the piece together and adhere them to the base of the card.

Please be sure to subscribe to my blog 

Follow me on Instagram

Subscribe to my youtube channel


Happy Crafting  :)

Angie


Tuesday, March 12, 2019

Kraftin' Kimmie Stamps - Make a Splash!


This card makes a rainy day bright using this wonderful stamp from Kraftin' Kimmie Stamps. Although I usually make the base of my cards in bright white for this card I decided to change it up and use grey given the rainy image. The base is a top folding 5 1/2" x 4 1/4" using 110lb coverstock.


The dotted base I used was from the Bo Bunny Baby Bump collection and was cut the 5 1/2" x 4 1/4". 


I used my Copic markers to color up this image as follows:

Copic Color Chart
Coat : Y11 Y13 Y15 Y19
Dress : R14 R29 R59
Water : B00 B02 B04
Eyes : B02
Grey pant stripes :  C1 C3 C5
Skin : E000 E00 E01 E02
Mouth : R89
Tongue : R29
Hair : E35 E47 E49


Once the stamp was colored I cut the piece to 4 3/4" x 3 3/8". I cut a base in crimson red 4 7/8 x 3 1/2". I adhered these pieces together and added foam to the base before securing it to the card. 


I cut the "sending sunshine your way" sentiment from the Pebbles Spring Fling 12x12 sheet "From me to you". I added foam to this piece before securing it to the card.


To finish off the card I found in my case of dies a great raindrops confetti die. I cut a bunch of smokey blue raindrops in various sizes and pasted them to the card.

Please be sure to subscribe to my blog 

Follow me on Instagram

Subscribe to my youtube channel


Happy Crafting  :)

Angie

Kraftin' Kimmie Stamps - Something Yummy Challenge!!!

Good morning and welcome to another fabulous and fun Saturday Challenge at Kraftin' Kimmie Stamps! https://kraftinkimmiestamps.blogspot....